Moneycontrol Brokerage Recos

Showing posts with label Autonomous Database. Show all posts

Saturday, April 25, 2020

Free Oracle OCI and Autonomous Database training & Certification


As most of the Oracle enthusiasts are aware of free Oracle Cloud Infrastructure and Autonomous database training and certifications being offered by Oracle until 15th May 2020, you must start your learning today and don't miss your train.

Oracle has given one of the best gift to all Oracle aspirants to learn new skills and earn the valuable certificate for free of cost - it is BIG gift.

Make a target, when you come out of this pandemic lock-down, you have new skills to show to your employer.


Below are the list of free Oracle cloud training one would be interested to learn.


It is just weeks away when you would miss this wonderful opportunity since the offer is only valid till 15th May 2020, just login to your oracle account, click on one of the training listed above and it would direct you to the training videos page.

Once finished with all the videos, you should have good understanding of the subject, do complete exam practice questionnaire  and book for your certification slot from the next section on the training videos page itself - this way you get to PearsonVue site get your exam booked for free.

Please make a note that you need to book your exam through the training site, and don't go directly to pearsonvue, otherwise you won't get it for free.


Hope it helps, thanks for reading, please subscribe to this blog to stay updated with latest news on Oracle Cloud Infrastructure and Oracle Autonomous Database Cloud Services and new articles.


Twitter : https://twitter.com/rajsoft8899
Linkedin : https://www.linkedin.com/in/raj-kumar-kushwaha-5a289219/
Facebook : https://www.facebook.com/rkushawaha


Thursday, October 17, 2019

Oracle Cloud Infrastructure(OCI) Service Health Dashboard


While you configure lots of Oracle Cloud Infrastructure resources across different cloud tenancy/region, you may be interested to keep track of health-checks status of all resources/services in your region to make sure everything is healthy in the cloud region where your important cloud services are hosted.

Oracle provides you a very convenient way to monitor the health of all OCI resources/services for all regions in one place.


In order to access the OCI health, you can directly go to the "https://ocistatus.oraclecloud.com/" URL where all OCI services health status is available for you to keep track of or if you are already logged in to your tenancy, click on the "View Health Dashboard" at right top corner  and it would take you to the OCI Health Dashboard page automatically.


From this dashboard you can get current status information about the services in your region.

Customers can self register by clicking on the 'Subscribe to Updates' link which offers email, SMS, Webhook, RSS, and other channels.

Notifications are delivered whenever OCI creates or resolves an incident.


There are four colored notations on the "OCI Health Dashboard" for you to identify whether a particular cloud service in a specific region is healthy or has some issues as following, if all cloud services are green then that has "Normal Performance" and everything is healthy and optimal.

Similarly, there is "Degraded Performance" , "Partial Outage" and "Major Outage" notations to identify the resource glitch.


Currently, you can see that everything is in "Normal Performance" range as below.


You can subscribe to incident notifications to your email address as when when there is an incident created in any regions or you can opt-in for your own region only where all your cloud services are running.


Hope it helps, thanks for reading, please subscribe to this blog to stay updated with latest news on Oracle Cloud Infrastructure and Oracle Autonomous Database Cloud Services and new articles.

Twitter : https://twitter.com/rajsoft8899
Linkedin : https://www.linkedin.com/in/raj-kumar-kushwaha-5a289219/
Facebook : https://www.facebook.com/rkushawaha


Tuesday, October 15, 2019

Always Free ATP instance stops automatically


SMART Oracle Cloud Feature !!


To save the unnecessary cloud infrastructure cost and utilization, Oracle Autonomous Database instances provisioned leveraging the Always Free tier subscription, stops automatically after 7 days when there is no recent activities to the ATP cloud instance.


Hope it helps, thanks for reading, please subscribe to this blog to stay updated with latest news on Oracle Cloud Infrastructure and Oracle Autonomous Database Cloud Services and new articles.

Twitter : https://twitter.com/rajsoft8899
Linkedin : https://www.linkedin.com/in/raj-kumar-kushwaha-5a289219/
Facebook : https://www.facebook.com/rkushawaha

Saturday, September 28, 2019

Oracle Cloud Infrastructure - Resources Monitoring | Email Notifications


In this article, we would see how to monitor the all Oracle Cloud Infrastructure(OCI) resources at one place and would see how to define alarm notifications for a kind of metric and metrics dimension.

You won't have access to the autonomous database compute nodes in the cloud but you have the luxury to monitor OS level statistics and can monitor the health, capacity, and performance of your Oracle Cloud Infrastructure resources when needed using queries or on a passive basis using alarms. Queries and alarms rely on metrics emitted by your resource to the Monitoring service.


An Administrator has super privilege to manage and monitoring all Oracle Cloud Infrastructure resources it has in its Identity domain/Tenancy.

If you want a different user to only monitor all the OCI resources then a new user can be created and assigned appropriate IAM policies to monitor the resources.

Monitoring is possible only for resources that is enabled for monitoring or which emits the metrics. Queries and Alarms used these emitted metrics for its notification rules and methods. The Monitoring service works with the Notifications service to notify you when metrics breach.

Lets' get started:

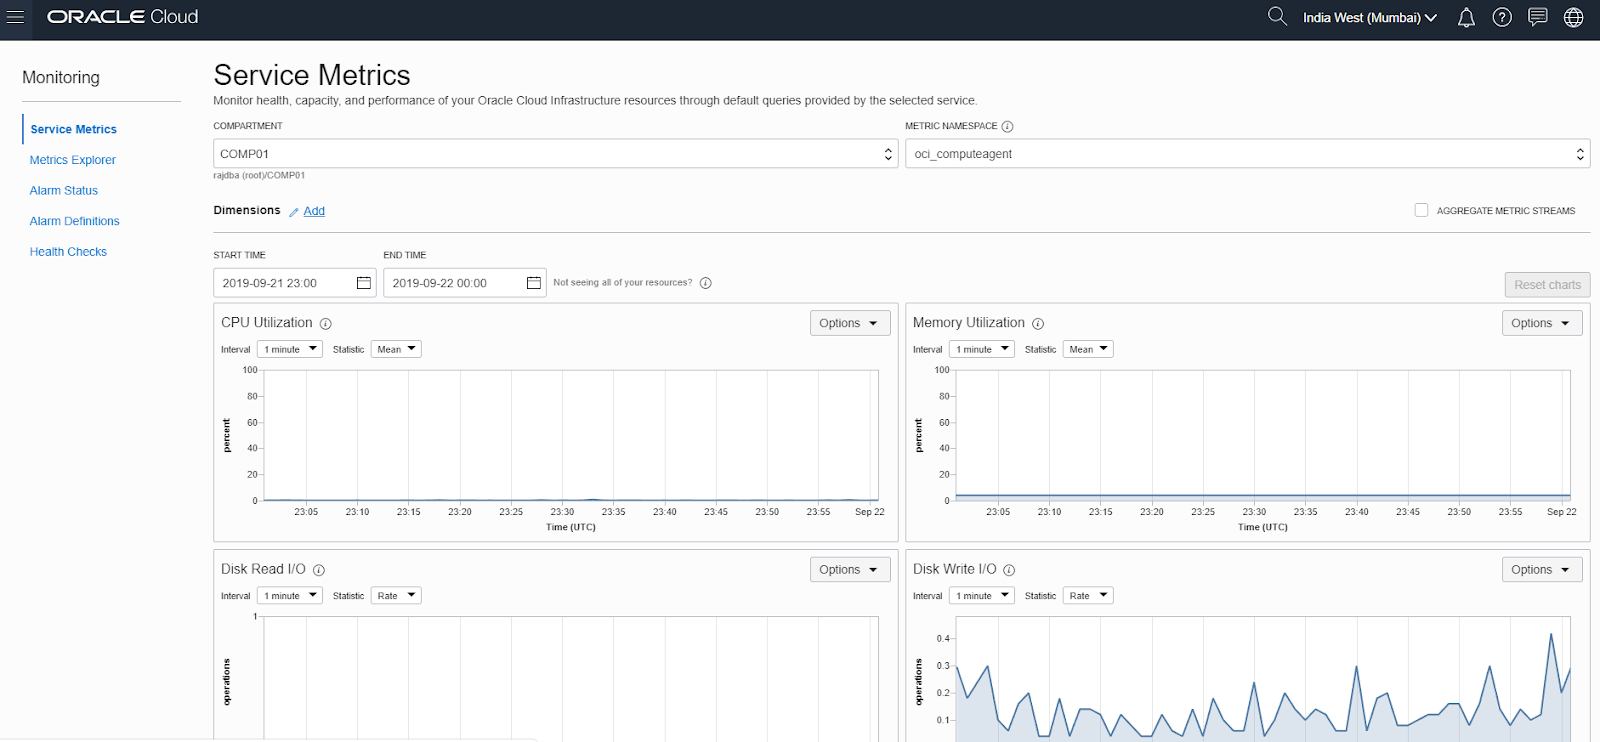
Login to your Oracle Cloud Infrastructure Service Console and click on the navigation menu and click on Monitoring > Service Metrics - to open the "Monitoring" page for all OCI resources.


"Service Metrics" page opens, The Service Metrics page displays the default charts for metrics in the first accessible Compartment and Metric Namespace. Very small or large values are indicated by International System of Units (SI units), such as M for mega (10 to the sixth power).

You can select any COMPARTMENT and appropriate METRICS NAMESPACE and adjust the "START TIME" and "END TIME" to narrow down the metrics graphic visualization for the metric namespaces and review its trend to predict the underline hardware/resource health.


For any Metrics type, you can click on its "Options" and Copy Chart URL - a direct URL to view this metrics graph in web browser.


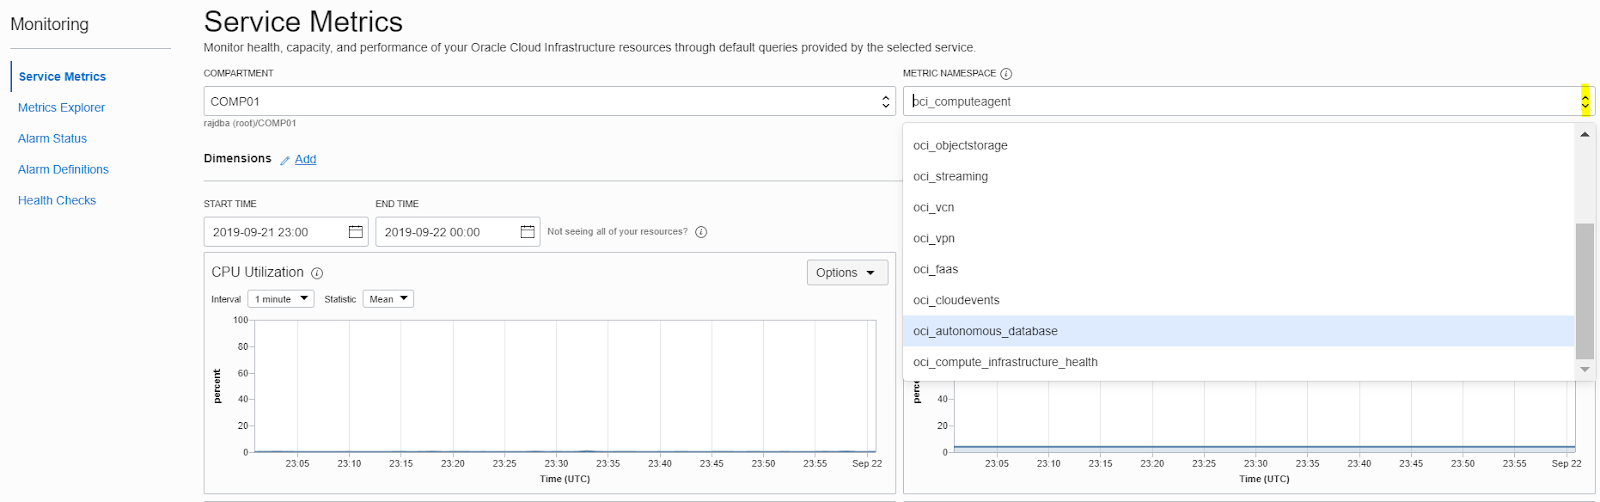
Select any metrics namespace you want to see the metrics trend.


Metrics Explorer:

Write and edit queries in Monitoring Query Language (MQL), using metrics from either your application or an Oracle Cloud Infrastructure service.

By default, Metrics Explorer has no graph, you can write MQL query or construct one automatically using the selection criteria.


Below I am adding an MQL(Monitoring Query Language) Query 1:

COMPARTMENT : comp01
Metrics Namespace : oci_autonomous_database
Metric name : cpuUtilization
Interval : 1m - 1 minute
Statistic : Mean
Metrics Dimension : AutonomousDBType
Dimension Value : ATP

and Click on Update Chart >


Once you clicked on the "Update Chart" above, it populates the "Metrics Explorer" chart metrics with graph for for the autonomous database.


Similarly, we can add another MQL query for the OCI compute agent for the metric name = DiskBytesWritten as below.


Alarm Status:


If you want to "Create Alarm" for any query, you can click on the "Create Alarm" button instead of "Update Chart" from the "Metric Explorer" or click on the "Alarm Definition" at left side and create alarm page opens up for some details to be filled up before finishing it.


In "Define Alarm" section, Provide relevant "Alarm Name" and its Severity and Alarm description. Optionally you can give resource tags as well.


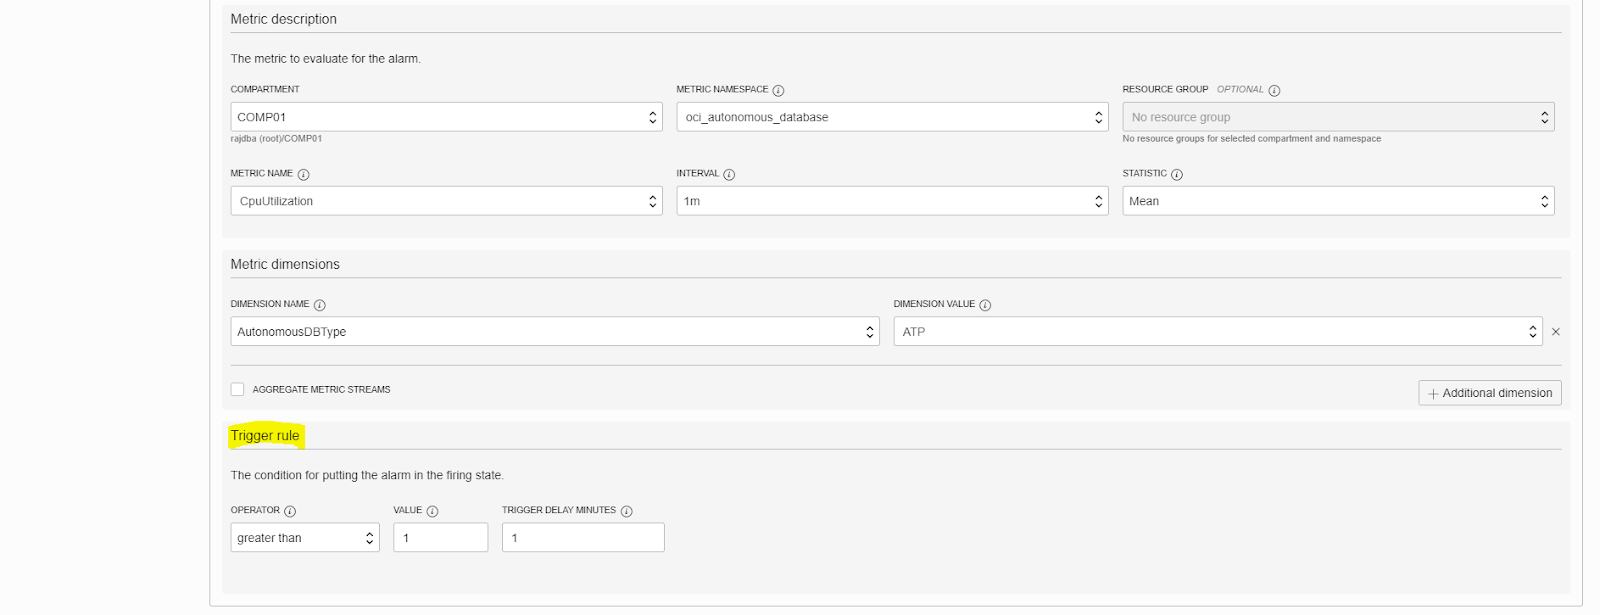
In the "Metric Description" section, Select the appropriate compartment, metric namespace, metric name to you to be alerted for, dimension name and its value. Most important, put the right trigger rule(it is the threshold value for the metric name you are enabling the alarming notification). In my case, I am creating this alarm for the CPU utilization, so I give trigger value 1 for the demonstration.


In the "Notification" section, select the right TOPIC in which you have defined the email subscription and click on "Save alarm".


If you don't have an Alarm Topic created then you can click on the "Create a Topic" and provide email details- Alarm Topic an email subscription where alarm notifications would be sent out. In my case, I am creating an alarm for the CPU utilization for my autonomous database dimensions. Provide "NOTIFICATION FREQUENCY" to re-evaluate the alarm status to make sure if that is still above it defined threshold or cleared, If alarm remains above its defined threshold then Alarm would fire and email alert at the subscribed email. Make sure alarm is checked as enabled in the end and click on "Save Alarm".


You should check the "REPEAT NOTIFICATION" option to provide the frequency to repeat the alarm notification if the event is not resolved/cleared.


Once you save, alarm gets create and available for the monitoring.


A while ago, you subscribed to an alarm topic that you created, you would receive an email confirmation once you subscribe to confirm for the destination email where alerts would be dispatched.

You get an email as below.


Alarm Definition:

Once you create the alarm, then you can go back to Alarm Definition to see the list of alarms you have created for the different OCI resource/dimensions monitoring.


To view the MQL for an alarm definition, you open an alarm and go to its Query section and expand it.


CpuUtilization[1m]{AutonomousDBType = "ATP"}.mean()


OCID1.AUTONOMOUSDATABASE.OC1.AP-MUMBAI-1.ABRG6LJRBEWFTBLJTRMG74GA6BJ3CBHXH6SQB3ESXDBYO2C3M2OKBGJ3OFUA


You can click on the Alarm Name to view its alarming history.


Once alert criteria meets then it fires and you get an email alert like below. If you don't want to receive any further email notification or a user wants to exclude himself from the email alert subscription then he/she can click on the "unsubscribe" link in the email alert body to stop receiving the alerts further.


Similarly, you define the alarming notifications for all metrics available for "METRIC NAMESPACE" in a compartment.

Hope it helps, thanks for reading, please subscribe to this blog to stay updated with latest news on Oracle Cloud Infrastructure and Oracle Autonomous Database Cloud Services and new articles.

Twitter : https://twitter.com/rajsoft8899
Linkedin : https://www.linkedin.com/in/raj-kumar-kushwaha-5a289219/


Thursday, September 26, 2019

Terminate an Oracle Autonomous Database Cloud


In this article, I would step you through the process to terminate an Oracle autonomous transaction processing database service.


Terminating an Autonomous Transaction Processing database permanently deletes the instance and removes all automatic backups. You cannot recover a terminated database.

Login your Oracle Cloud Infrastructure Service console and navigate to Autonomous Transaction Processing database.

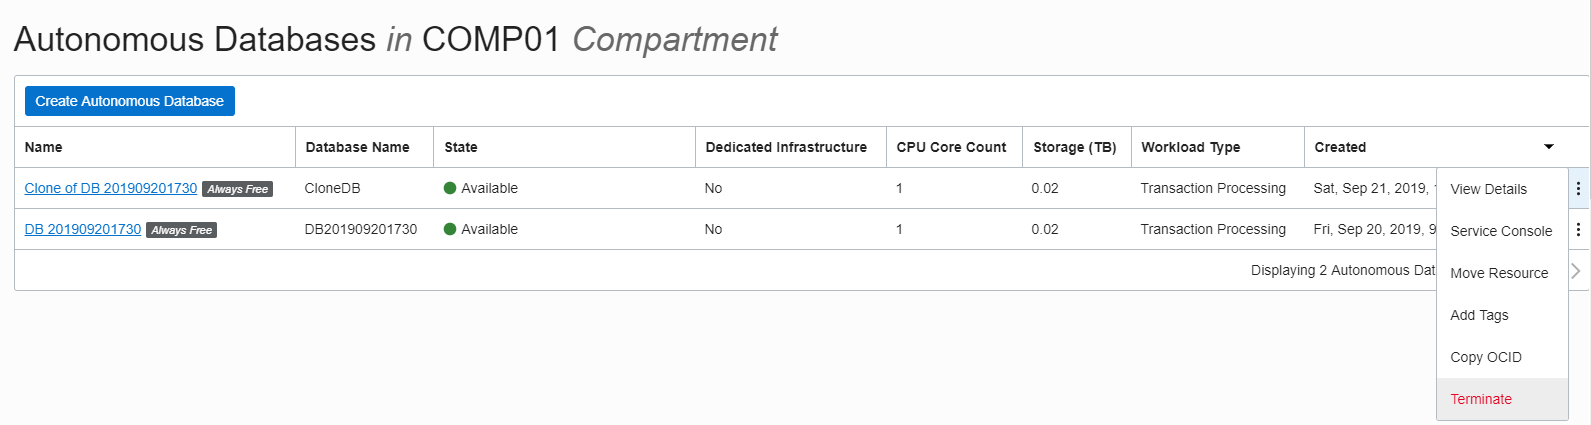
You get to the Autonomous Databases list, move your cursor to three dots at right side against the ATP instance your want to terminate/delete.

Click on the "Terminate" from the drop down list.


Once you click on the "Terminate", it asks for the confirmation, to enter your Autonomous Database name you wanted to terminate and click on the "Terminate Autonomous Database" to initiate the termination job.


ATP Instance terminated:


Hope it helps, thanks for reading, please subscribe to this blog to stay updated with latest news on Oracle Autonomous Database Cloud Services and new articles.

Twitter : https://twitter.com/rajsoft8899
Linkedin : https://www.linkedin.com/in/raj-kumar-kushwaha-5a289219/


Monday, September 23, 2019

Single-Click APEX startup on Oracle Autonomous Database


One of the very exciting feature for Oracle Cloud Administrators and Developers to manage and user the Oracle APEX, now you can start APEX with just a single click, that too running on Oracle Autonomous Database Cloud Services in Gen 2 Oracle Cloud Infrastructure Services.

Here in this article, I would step you through to get an overview how you can do it in its simplest way as it is designed.

Cloud Administrator or ATP Database Administrator can login to the Autonomous Transaction Processing Database instance it wants to startup the APEX Framework for and click on the "Development" at left side in the panel  > then click on the "Oracle APEX" which directly opens up an new browser/tab to login to APEX framework or you copy the URL from the "RESTful Services and SODA" and paste it in the another tab/browser to go to the APEX login page .


Clicked in the "Oracle APEX" and its "Administration Services" login page appears, since it is our brand new ATP instance and first time opening the APEX so we need to login as ADMIN user to create developer users and workspaces in there to be used by them.


After Login as Admin, it welcomes to "Create Workspace"


Click on the "Create Workspace" and give new or existing database user to use with your new workspace, if there users already in the database then you can click at right side of the "Database User" box to get the list of users and select one. I am just creating the new one here.


Once all information provided, click on the "Create Workplace" and creates in seconds.


Now, log off from Administration account and login back with development user name : USER01


APEX Framework homepage opens.


SQL Worksheet tab:


Team Development Tab :


App Gallery:

From the "App Gallery" you can install any available application you want instantly just by clicking on it, look at followed screenshot after it.


Application Installed:


Open the application by clicking the Play icon right next to the "Manage" button to start using the application.


Hope it helps, thanks for reading, please subscribe to this blog to stay updated with latest news on Oracle Autonomous Database Cloud Services and new articles.

Twitter : https://twitter.com/rajsoft8899
Linkedin : https://www.linkedin.com/in/raj-kumar-kushwaha-5a289219/