Moneycontrol Brokerage Recos

Friday, September 4, 2020

Configure Quorum Disk in Exadata


In last article[click here] - we learnt how to remove quorum disk from the Exadata system, now here we would see it we add and configure that.


Before we are adding quorum disk configuration in the system, you need to have IB switches interface names, ASM binary owner and group handy as that is required to create the config.


[root@exa01dbadm01 oracle.SupportTools]# /opt/oracle.SupportTools/quorumdiskmgr --create --config --owner=oragrid --group=asmadmin --network-iface-list="ib0, ib1"
[Info] Successfully created iface exadata_ib0 with iface.net_ifacename ib0
[Info] Successfully created iface exadata_ib1 with iface.net_ifacename ib1
[Success] Successfully created quorum disk configurations

[root@exa01dbadm01 oracle.SupportTools]#


Do the same as above on node2 as well.

[root@exa01dbadm02 oracle.SupportTools]# /opt/oracle.SupportTools/quorumdiskmgr --create --config --owner=oragrid --group=asmadmin --network-iface-list="ib0, ib1"
[Info] Successfully created iface exadata_ib0 with iface.net_ifacename ib0
[Info] Successfully created iface exadata_ib1 with iface.net_ifacename ib1
[Success] Successfully created quorum disk configurations

[root@exa01dbadm02 oracle.SupportTools]#


Check if the quoum disk configuration is created as below from node1 and node2.

[root@exa01dbadm01 oracle.SupportTools]# /opt/oracle.SupportTools/quorumdiskmgr --list --config
Owner: oragrid
Group: asmadmin
ifaces: exadata_ib1 exadata_ib0
Initiatior name: iqn.1988-12.com.oracle:192.168.10.1

[root@exa01dbadm01 oracle.SupportTools]#
[root@exa01dbadm02 oracle.SupportTools]# /opt/oracle.SupportTools/quorumdiskmgr --list --config
Owner: oragrid
Group: asmadmin
ifaces: exadata_ib1 exadata_ib0
Initiatior name: iqn.1988-12.com.oracle:192.168.10.3

[root@exa01dbadm02 oracle.SupportTools]#


Now, create quorum disk target for DATAC1 diskgroup which is visible to both compute nodes, before it you need to identify IB interface IPs of both nodes as that is required here.


Run the command on node1 and node2.

[root@exa01dbadm01 oracle.SupportTools]# /opt/oracle.SupportTools/quorumdiskmgr --create --target --asm-disk-group=datac1 --visible-to="192.168.10.1, 192.168.10.2, 192.168.10.3, 192.168.10.4"
[Success] Created logical volume /dev/VGExaDb/LVDbVdexa01dbadm01DATAC1.
[Success] Created backstore QD_DATAC1_exa01dbadm01.
[Success] Created target iqn.2015-05.com.oracle:qd--datac1--exa01dbadm01.

[root@exa01dbadm01 oracle.SupportTools]#
[root@exa01dbadm02 oracle.SupportTools]# /opt/oracle.SupportTools/quorumdiskmgr --create --target --asm-disk-group=datac1 --visible-to="192.168.10.1, 192.168.10.2, 192.168.10.3, 192.168.10.4"
[Success] Created logical volume /dev/VGExaDb/LVDbVdexa01dbadm02DATAC1.
[Success] Created backstore QD_DATAC1_exa01dbadm02.
[Success] Created target iqn.2015-05.com.oracle:qd--datac1--exa01dbadm02.

[root@exa01dbadm02 oracle.SupportTools]#


Now you can list the quorum disk targets on node1 and node2 as below to validate.

[root@exa01dbadm01 oracle.SupportTools]# /opt/oracle.SupportTools/quorumdiskmgr --list --target
Name: iqn.2015-05.com.oracle:qd--datac1--exa01dbadm01
Host name: exa01dbadm01
ASM disk group name: DATAC1
Visible to: iqn.1988-12.com.oracle:192.168.10.1, iqn.1988-12.com.oracle:192.168.10.2, iqn.1988-12.com.oracle:192.168.10.3, iqn.1988-12.com.oracle:192.168.10.4
Discovered by:


[root@exa01dbadm01 oracle.SupportTools]#
[root@exa01dbadm02 oracle.SupportTools]# /opt/oracle.SupportTools/quorumdiskmgr --list --target
Name: iqn.2015-05.com.oracle:qd--datac1--exa01dbadm02
Host name: exa01dbadm02
ASM disk group name: DATAC1
Visible to: iqn.1988-12.com.oracle:192.168.10.1, iqn.1988-12.com.oracle:192.168.10.2, iqn.1988-12.com.oracle:192.168.10.3, iqn.1988-12.com.oracle:192.168.10.4
Discovered by:


[root@exa01dbadm02 oracle.SupportTools]#


Create quorum disk device as below on node1 and node2.

[root@exa01dbadm01 oracle.SupportTools]# /opt/oracle.SupportTools/quorumdiskmgr --create --device --target-ip-list="192.168.10.1, 192.168.10.2, 192.168.10.3, 192.168.10.4"
[Success] Successfully created all device(s) from target(s) on machine with IP address 192.168.10.1

[Success] Successfully created all device(s) from target(s) on machine with IP address 192.168.10.2

[Success] Successfully created all device(s) from target(s) on machine with IP address 192.168.10.3

[Success] Successfully created all device(s) from target(s) on machine with IP address 192.168.10.4

[root@exa01dbadm01 oracle.SupportTools]#
[root@exa01dbadm02 oracle.SupportTools]# /opt/oracle.SupportTools/quorumdiskmgr --create --device --target-ip-list="192.168.10.1, 192.168.10.2, 192.168.10.3, 192.168.10.4"
[Success] Successfully created all device(s) from target(s) on machine with IP address 192.168.10.1

[Success] Successfully created all device(s) from target(s) on machine with IP address 192.168.10.2

[Success] Successfully created all device(s) from target(s) on machine with IP address 192.168.10.3

[Success] Successfully created all device(s) from target(s) on machine with IP address 192.168.10.4

[root@exa01dbadm02 oracle.SupportTools]#


Now you can list the quorum disk device on node1 and node2 to validate.

[root@exa01dbadm01 oracle.SupportTools]# /opt/oracle.SupportTools/quorumdiskmgr --list --device
Device path: /dev/exadata_quorum/QD_DATAC1_exa01dbadm01
Host name: exa01dbadm01
ASM disk group name: DATAC1
Size: 128 MB

Device path: /dev/exadata_quorum/QD_DATAC1_exa01dbadm02
Host name: exa01dbadm02
ASM disk group name: DATAC1
Size: 128 MB


[root@exa01dbadm01 oracle.SupportTools]#


[root@exa01dbadm02 oracle.SupportTools]# /opt/oracle.SupportTools/quorumdiskmgr --list --device
Device path: /dev/exadata_quorum/QD_DATAC1_exa01dbadm02
Host name: exa01dbadm02
ASM disk group name: DATAC1
Size: 128 MB

Device path: /dev/exadata_quorum/QD_DATAC1_exa01dbadm01
Host name: exa01dbadm01
ASM disk group name: DATAC1
Size: 128 MB


[root@exa01dbadm02 oracle.SupportTools]#


Now, check in the ASM instance if quorum disk devices are visible to ASM to be used for the DATAC1 diskgroup as below, we can see that quorum disk devices are available as CANDIDATE disks that we can add in to the diskgroup.

SQL> l
  1* SELECT inst_id, label, path, mode_status, header_status FROM gv$asm_disk WHERE path LIKE '/dev/exadata_quorum/%'
SQL> /

   INST_ID LABEL                           PATH                                                                   MODE_ST HEADER_STATU
---------- ------------------------------- ---------------------------------------------------------------------- ------- ------------
         1 QD_DATAC1_exa01dbadm02      /dev/exadata_quorum/QD_DATAC1_exa01dbadm02                         ONLINE  CANDIDATE
         1 QD_DATAC1_exa01dbadm01      /dev/exadata_quorum/QD_DATAC1_exa01dbadm01                         ONLINE  CANDIDATE
         2 QD_DATAC1_exa01dbadm02      /dev/exadata_quorum/QD_DATAC1_exa01dbadm02                         ONLINE  CANDIDATE
         2 QD_DATAC1_exa01dbadm01      /dev/exadata_quorum/QD_DATAC1_exa01dbadm01                         ONLINE  CANDIDATE

SQL>


Add the quorum devices in to the diskgroup as below.

SQL> ALTER DISKGROUP datac1 ADD QUORUM FAILGROUP exa01dbadm01 DISK '/dev/exadata_quorum/QD_DATAC1_exa01dbadm01'
QUORUM FAILGROUP exa01dbadm02 DISK '/dev/exadata_quorum/QD_DATAC1_exa01dbadm02';  2

Diskgroup altered.

SQL>


After disk addition, we can see that now these are parts of diskgroup and status is MEMBER.


SQL> SELECT inst_id, label, path, mode_status, header_status
FROM gv$asm_disk WHERE path LIKE '/dev/exadata_quorum/%';  2

   INST_ID LABEL                           PATH                                                                   MODE_ST HEADER_STATU
---------- ------------------------------- ---------------------------------------------------------------------- ------- ------------
         1 QD_DATAC1_exa01dbadm02      /dev/exadata_quorum/QD_DATAC1_exa01dbadm02                         ONLINE  MEMBER
         1 QD_DATAC1_exa01dbadm01      /dev/exadata_quorum/QD_DATAC1_exa01dbadm01                         ONLINE  MEMBER
         2 QD_DATAC1_exa01dbadm02      /dev/exadata_quorum/QD_DATAC1_exa01dbadm02                         ONLINE  MEMBER
         2 QD_DATAC1_exa01dbadm01      /dev/exadata_quorum/QD_DATAC1_exa01dbadm01                         ONLINE  MEMBER

SQL>


Finally, replaced/moved the voting disks back to DATAC1 diskgroup and five copies of files are now available.

[root@exa01dbadm02 oracle.SupportTools]# crsctl query css votedisk
##  STATE    File Universal Id                File Name Disk group
--  -----    -----------------                --------- ---------
 1. ONLINE   cf9c32d1c0c34fafbf47caa1b77821b0 (o/10.0.0.5;10.0.0.6/DATAC1_CD_02_exad02cel01) [DATAC1]
 2. ONLINE   e2e61cd646224f08bf2c4c47e719e8fd (o/10.0.0.3;10.0.0.4/DATAC1_CD_05_exad02cel02) [DATAC1]
 3. ONLINE   7691da5101a34f95bfc56c3bec4e681b (o/10.0.0.1;10.0.0.2/DATAC1_CD_03_exad02cel03) [DATAC1]
 4. ONLINE   3dea97bdc5aa4f61bf0355abe31c1361 (/dev/exadata_quorum/QD_DATAC1_exa01dbadm02) [DATAC1]
 5. ONLINE   cc5671a086eb4f38bf5c690666099d66 (/dev/exadata_quorum/QD_DATAC1_exa01dbadm01) [DATAC1]
Located 5 voting disk(s).
[root@exa01dbadm02 oracle.SupportTools]#


After CRS restart : I bounced the CRS on both nodes to check if things are coming up normally.


[root@exa01dbadm02 oracle.SupportTools]# crsctl query css votedisk
##  STATE    File Universal Id                File Name Disk group
--  -----    -----------------                --------- ---------
 1. ONLINE   cf9c32d1c0c34fafbf47caa1b77821b0 (o/10.0.0.5;10.0.0.6/DATAC1_CD_02_exad02cel01) [DATAC1]
 2. ONLINE   e2e61cd646224f08bf2c4c47e719e8fd (o/10.0.0.3;10.0.0.4/DATAC1_CD_05_exad02cel02) [DATAC1]
 3. ONLINE   7691da5101a34f95bfc56c3bec4e681b (o/10.0.0.1;10.0.0.2/DATAC1_CD_03_exad02cel03) [DATAC1]
 4. ONLINE   3dea97bdc5aa4f61bf0355abe31c1361 (/dev/exadata_quorum/QD_DATAC1_exa01dbadm02) [DATAC1]
 5. ONLINE   cc5671a086eb4f38bf5c690666099d66 (/dev/exadata_quorum/QD_DATAC1_exa01dbadm01) [DATAC1]
Located 5 voting disk(s).
[root@exa01dbadm02 oracle.SupportTools]#


Our missing quorum disk issue stands fixed here......!!


Hope it helps, thanks for reading, please subscribe to this blog to stay updated with latest news on Oracle Cloud Infrastructure and Oracle Autonomous Database Cloud Services and new articles.


Twitter : https://twitter.com/rajsoft8899

Linkedin : https://www.linkedin.com/in/raj-kumar-kushwaha-5a289219/

Facebook : https://www.facebook.com/rkushawaha


Monday, August 31, 2020

Removing the Quorum Disk Configuration in Exadata


In this blog post, we would see how to remove quorum disks in Exadata machine. We have one 1/8th Rack Exadata machine for Lab activity where ran into missing quorum disks for Voting Disk and I had to fix that in order to get the system patched in Rolling fashion to maintain high availability.

To patch the Exadata system in rolling fashion, it requires voting disks to reside on HIGH redundancy diskgroup which is not possible in 1/8th Rack Exadata system since there is only 3 cell nodes in there, and for High redundancy it requires five copies of voting disk.


So, in this scenario - we add a separate HDD drive on both compute nodes and share that between the nodes to be used for High redundancy diskgroup creation - there it comes the term "Quorum Disk"


We have +DATAC1 diskgroup configured with HIGH redundancy where our voting disk resides but two of the quorum disks being used in there went missing so our voting disks had only three copies available and CRS was not coming up.


I had to remove the quorum disks from both compute nodes and then configure it back to fix the issue.


SQL> l 
  1* select disk_number, GROUP_NUMBER, MOUNT_STATUS, HEADER_STATUS, MODE_STATUS, STATE, path from v$asm_disk where GROUP_NUMBER=1
SQL> / 

DISK_NUMBER GROUP_NUMBER MOUNT_S HEADER_STATU MODE_ST STATE    PATH 
----------- ------------ ------- ------------ ------- -------- ---------------------------------------------------------------------- 
          2            1 MISSING UNKNOWN      OFFLINE NORMAL 
          3            1 MISSING UNKNOWN      OFFLINE NORMAL 
         14            1 CACHED  MEMBER       ONLINE  NORMAL   o/10.0.0.1;10.0.0.2/DATAC1_CD_05_exad02cel03
         13            1 CACHED  MEMBER       ONLINE  NORMAL   o/10.0.0.1;10.0.0.2/DATAC1_CD_00_exad02cel03
         15            1 CACHED  MEMBER       ONLINE  NORMAL   o/10.0.0.1;10.0.0.2/DATAC1_CD_02_exad02cel03
          7            1 CACHED  MEMBER       ONLINE  NORMAL   o/10.0.0.1;10.0.0.2/DATAC1_CD_03_exad02cel03
          8            1 CACHED  MEMBER       ONLINE  NORMAL   o/10.0.0.1;10.0.0.2/DATAC1_CD_04_exad02cel03
          0            1 CACHED  MEMBER       ONLINE  NORMAL   o/10.0.0.1;10.0.0.2/DATAC1_CD_01_exad02cel03
          4            1 CACHED  MEMBER       ONLINE  NORMAL   o/10.0.0.3;10.0.0.4/DATAC1_CD_05_exad02cel02
         16            1 CACHED  MEMBER       ONLINE  NORMAL   o/10.0.0.3;10.0.0.4/DATAC1_CD_02_exad02cel02
         17            1 CACHED  MEMBER       ONLINE  NORMAL   o/10.0.0.3;10.0.0.4/DATAC1_CD_01_exad02cel02
          5            1 CACHED  MEMBER       ONLINE  NORMAL   o/10.0.0.3;10.0.0.4/DATAC1_CD_00_exad02cel02
          6            1 CACHED  MEMBER       ONLINE  NORMAL   o/10.0.0.3;10.0.0.4/DATAC1_CD_03_exad02cel02
         11            1 CACHED  MEMBER       ONLINE  NORMAL   o/10.0.0.3;10.0.0.4/DATAC1_CD_04_exad02cel02
         19            1 CACHED  MEMBER       ONLINE  NORMAL   o/10.0.0.5;10.0.0.6/DATAC1_CD_04_exad02cel01
          1            1 CACHED  MEMBER       ONLINE  NORMAL   o/10.0.0.5;10.0.0.6/DATAC1_CD_02_exad02cel01
         18            1 CACHED  MEMBER       ONLINE  NORMAL   o/10.0.0.5;10.0.0.6/DATAC1_CD_00_exad02cel01
          9            1 CACHED  MEMBER       ONLINE  NORMAL   o/10.0.0.5;10.0.0.6/DATAC1_CD_03_exad02cel01
         12            1 CACHED  MEMBER       ONLINE  NORMAL   o/10.0.0.5;10.0.0.6/DATAC1_CD_01_exad02cel01


Due to missing quorum disk in the DATAC1 diskgroup, we have only three copies of voting disks available as of now.

[root@exa01dbadm02 ~]# crsctl query css votedisk
##  STATE    File Universal Id                File Name Disk group
--  -----    -----------------                --------- ---------
 1. ONLINE   94acaa401bd34fe0bf261af4437fc75e (o/10.0.0.5;10.0.0.6/DATAC1_CD_02_exad02cel01) [DATAC1]
 2. ONLINE   7680d9f206544ff1bf27661bf8cc3250 (o/10.0.0.3;10.0.0.4/DATAC1_CD_05_exad02cel02) [DATAC1]
 3. ONLINE   b632f75fe4884f5cbf3627faa6bbbe07 (o/10.0.0.1;10.0.0.2/DATAC1_CD_03_exad02cel03) [DATAC1]
Located 3 voting disk(s).
[root@exa01dbadm02 ~]#


I moved the voting disks to +RECOC1 diskgroup which was configured with NORMAL REDUNDANCY.


[oragrid@exa01dbadm01 ~]$ crsctl replace votedisk +RECOC1
Successful addition of voting disk 783e7633ea934fd0bff78c8b8dbe5a66.
Successful addition of voting disk a5cf9e2d99134f69bf6bb15c98044623.
Successful addition of voting disk d5d20cd6ff3e4fcdbf68df28cb18d030.
Successful deletion of voting disk 94acaa401bd34fe0bf261af4437fc75e.
Successful deletion of voting disk 7680d9f206544ff1bf27661bf8cc3250.
Successful deletion of voting disk b632f75fe4884f5cbf3627faa6bbbe07.
Successful deletion of voting disk e47d60407b054f3bbf5dc07df8080ee6.
Successfully replaced voting disk group with +RECOC1.
CRS-4266: Voting file(s) successfully replaced


[oragrid@exa01dbadm01 ~]$ crsctl query css votedisk
##  STATE    File Universal Id                File Name Disk group
--  -----    -----------------                --------- ---------
 1. ONLINE   783e7633ea934fd0bff78c8b8dbe5a66 (o/10.0.0.5;10.0.0.6/RECOC1_CD_02_exad02cel01) [RECOC1]
 2. ONLINE   a5cf9e2d99134f69bf6bb15c98044623 (o/10.0.0.3;10.0.0.4/RECOC1_CD_02_exad02cel02) [RECOC1]
 3. ONLINE   d5d20cd6ff3e4fcdbf68df28cb18d030 (o/10.0.0.1;10.0.0.2/RECOC1_CD_02_exad02cel03) [RECOC1]
Located 3 voting disk(s).
[oragrid@exa01dbadm01 ~]$


Now we can go ahead and drop the missing quorum disks from the DATAC1 diskgroup forcefully.


[oragrid@exa01dbadm01 ~]$ sqlplus "/as sysasm"

SQL*Plus: Release 12.2.0.1.0 Production on Thu Jul 30 12:06:27 2020

Copyright (c) 1982, 2016, Oracle.  All rights reserved.


Connected to:
Oracle Database 12c Enterprise Edition Release 12.2.0.1.0 - 64bit Production

SQL>
SQL> set lines 300
SQL> ALTER DISKGROUP DATAC1 DROP QUORUM DISK QD_DATAC1_exa01dbadm01 FORCE;

Diskgroup altered.

SQL> ALTER DISKGROUP DATAC1 DROP QUORUM DISK QD_DATAC1_exa01dbadm02 FORCE;

Diskgroup altered.

SQL>


Delete the quorum disk device from the node1 using quorumdiskmgr utility.

[root@exa01dbadm01 ~]# cd /opt/oracle.SupportTools/
[root@exa01dbadm01 oracle.SupportTools]# ./quorumdiskmgr --delete --device
[Success] Successfully deleted device /dev/exadata_quorum/QD_DATAC1_exa01dbadm01.
[Success] Successfully deleted device /dev/exadata_quorum/QD_DATAC1_exa01dbadm02.

Delete the quorum disk target from the node1 using quorumdiskmgr utility.

[root@exa01dbadm01 oracle.SupportTools]# ./quorumdiskmgr --delete --target
[Success] Successfully removed target iqn.2015-05.com.oracle:qd--datac1--exa01dbadm01
[Success] Successfully removed backstore QD_DATAC1_exa01dbadm01
[Success] Successfully removed logical volume /dev/VGExaDb/LVDbVdexa01dbadm01DATAC1


Now delete quorum disk configuration from the node1.

[root@exa01dbadm01 oracle.SupportTools]# ./quorumdiskmgr --delete --config

[Success] Successfully deleted quorum disk configurations

[root@exa01dbadm01 oracle.SupportTools]#


Now, delete the quorum disk device from node2.

[root@exa01dbadm02 ~]# cd /opt/oracle.SupportTools/
[root@exa01dbadm02 oracle.SupportTools]# ./quorumdiskmgr --delete --device
[Success] Successfully deleted device /dev/exadata_quorum/QD_DATAC1_exa01dbadm01.
[Success] Successfully deleted device /dev/exadata_quorum/QD_DATAC1_exa01dbadm02.

Delete quorum disk target from node2.

[root@exa01dbadm02 oracle.SupportTools]# ./quorumdiskmgr --delete --target
[Success] Successfully removed target iqn.2015-05.com.oracle:qd--datac1--exa01dbadm02
[Success] Successfully removed backstore QD_DATAC1_exa01dbadm02
[Success] Successfully removed logical volume /dev/VGExaDb/LVDbVdexa01dbadm02DATAC1

Delete quorum disk configuration from node 2.

[root@exa01dbadm02 oracle.SupportTools]#  ./quorumdiskmgr --delete --config
[Success] Successfully deleted quorum disk configurations

[root@exa01dbadm02 oracle.SupportTools]#


At this point, we are done with removing the quorum disk configuration from our Exadata System, in next post, I would detail how we configure it in the system.


Hope it helps, thanks for reading, please subscribe to this blog to stay updated with latest news on Oracle Cloud Infrastructure and Oracle Autonomous Database Cloud Services and new articles.


Twitter : https://twitter.com/rajsoft8899

Linkedin : https://www.linkedin.com/in/raj-kumar-kushwaha-5a289219/

Facebook : https://www.facebook.com/rkushawaha


Sunday, May 31, 2020

1Z0-1072 : Oracle Cloud Infrastructure 2019 Architect Associate


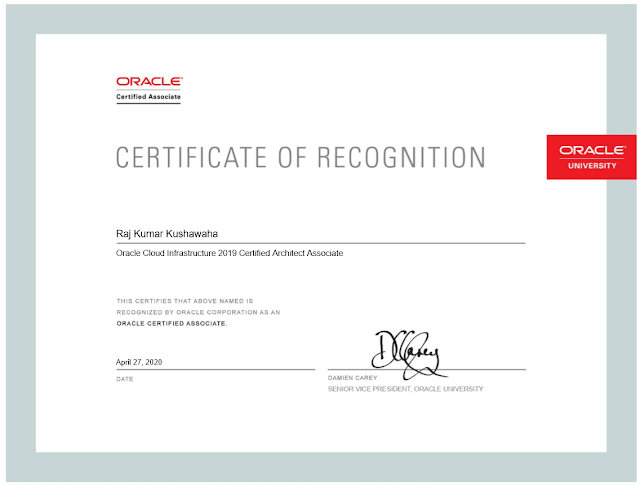
Pleased to inform you all that I passed 1Z0-1072 : Oracle Cloud Infrastructure 2019 Architect Associate.


It's generosity of Oracle that it made its official training videos of  "Cloud Infrastructure 2019 Architect Associate" public and also offered to appear for the exam at free of cost in this time of pandemic crisis around the globe, it given us an opportunity to learn and scale our skills to enhance our career as well as expanding our area of expertise.


At this time of writing, Oracle has offered multiple Oracle cloud related training and certifications at free of cost, click here to know all those which is available in the list as of now - or you can

Click here to directly go to the OCI Associate training videos and start learning the new.


Click here for the practice exam.


Click here for Oracle Cloud Infrastructure (OCI) Architect Associate exam 2019 (1Z0-1072) StudyGuide


Certification Details
Certification name: 1Z0-1072 - Oracle Cloud Infrastructure 2019 Architect Associate
Target audience: Designed for professionals responsible for designing infrastructure solutions using Oracle Cloud Infrastructure services
Exam price: $150
Format: Multiple choice
Duration: 105 minutes
Number of questions: 66
Passing score: 65%


I encourage you to utilize this opportunity and learn and add new skills in your professional profile.


Hope it helps, thanks for reading, please subscribe to this blog to stay updated with latest news on Oracle Cloud Infrastructure and Oracle Autonomous Database Cloud Services and new articles.


Wednesday, May 13, 2020

Oracle Cloud Infrastructure vs. AWS


Oracle Cloud Infrastructure vs. AWS


Read here to know great insights on how Oracle Cloud Infrastructure services price are much cheaper with greater performance as compared to AWS Cloud services.


Read here - https://www.oracle.com/cloud/economics/


Hope it helps, thanks for reading, please subscribe to this blog to stay updated with latest news on Oracle Cloud Infrastructure and Oracle Autonomous Database Cloud Services and new articles.


Twitter : https://twitter.com/rajsoft8899

Linkedin : https://www.linkedin.com/in/raj-kumar-kushwaha-5a289219/

Facebook : https://www.facebook.com/rkushawaha


Saturday, April 25, 2020

Free Oracle OCI and Autonomous Database training & Certification


As most of the Oracle enthusiasts are aware of free Oracle Cloud Infrastructure and Autonomous database training and certifications being offered by Oracle until 15th May 2020, you must start your learning today and don't miss your train.

Oracle has given one of the best gift to all Oracle aspirants to learn new skills and earn the valuable certificate for free of cost - it is BIG gift.

Make a target, when you come out of this pandemic lock-down, you have new skills to show to your employer.


Below are the list of free Oracle cloud training one would be interested to learn.


It is just weeks away when you would miss this wonderful opportunity since the offer is only valid till 15th May 2020, just login to your oracle account, click on one of the training listed above and it would direct you to the training videos page.

Once finished with all the videos, you should have good understanding of the subject, do complete exam practice questionnaire  and book for your certification slot from the next section on the training videos page itself - this way you get to PearsonVue site get your exam booked for free.

Please make a note that you need to book your exam through the training site, and don't go directly to pearsonvue, otherwise you won't get it for free.


Hope it helps, thanks for reading, please subscribe to this blog to stay updated with latest news on Oracle Cloud Infrastructure and Oracle Autonomous Database Cloud Services and new articles.


Twitter : https://twitter.com/rajsoft8899
Linkedin : https://www.linkedin.com/in/raj-kumar-kushwaha-5a289219/
Facebook : https://www.facebook.com/rkushawaha


Wednesday, April 15, 2020

Oracle Critical Patch Update for April 2020 is out today


Oracle Critical Patch Update for April 2020
===============================


Critical Patch Update Advisories are available at the following location:

Oracle Technology Network: https://www.oracle.com/security-alerts/

Oracle Cloud Customers should review:
https://www.oracle.com/security-alerts/#cloud

The Critical Patch Update Advisory for April 2020 is available at the following location:

Oracle Technology Network:
https://www.oracle.com/security-alerts/cpuapr2020.html

Important information can also be found at:
https://blogs.oracle.com/security/

Oracle's Security Fixing Policies are available at the following location:

https://www.oracle.com/corporate/security-practices/assurance/vulnerability/security-fixing.html

The next four dates for Critical Patch Updates are:
  • July 14, 2020
  • October 20, 2020
  • January 19, 2021
  • April 20, 2021


Hope it helps, thanks for reading, please subscribe to this blog to stay updated with latest news on Oracle Cloud Infrastructure and Oracle Autonomous Database Cloud Services and new articles.

Twitter : https://twitter.com/rajsoft8899
Linkedin : https://www.linkedin.com/in/raj-kumar-kushwaha-5a289219/
Facebook : https://www.facebook.com/rkushawaha


Saturday, March 7, 2020

Creating Pluggable Database using OEM


Here in this article, I would demonstrate how we can create a new Pluggable Database using Oracle Enterprise Manager 13c.


1 - Login to the Oracle Enterprise Manager to go the Container Database target Home Page in which you want to create the new Pluggable Database.


2 - From the drop-down Menu of Cluster Database, Navigate to Provisioning > Provision Pluggable Databases.


3 - Create Pluggable Database : Creation Options page opens, Select "Create a new PDB" and provide oracle software owner credentials in the "Host Credentials" property. Click Next.


Click Next.


It validates the /tmp directory space on the nodes being provisioned.


You can schedule the provision date/time or you can just start the job right away with immediate option.


You can monitor the CreatePluggableDatabase job progress - Click on "View Execution Details" tab to monitor the progress.


Provisioning job's status now "Succeeded" and you are done with provisioning. You can validate the PDB status in OEM or by logging to the Container CDB at the host.


Hope it helps, thanks for reading, please subscribe to this blog to stay updated with latest news on Oracle Cloud Infrastructure and Oracle Autonomous Database Cloud Services and new articles.

Twitter : https://twitter.com/rajsoft8899
Linkedin : https://www.linkedin.com/in/raj-kumar-kushwaha-5a289219/
Facebook : https://www.facebook.com/rkushawaha


Friday, March 6, 2020

DBCS - Database Cloud Service Patching


Here in this article, I would summarize how easily we can do the "Database Cloud Service" patching online just via few clicks from the "Oracle Cloud Service Console".


Login to the Cloud Console and go to the DBCS instance page.


Click on the DBCS instance you want to patch, Instance Overview page opens. In my below example, there is a primary and standby Cloud instances.


At left side, click on the "Administration" tab, Patching page opens up which has list of all Available Patches for the underline DBCS instance.


Choose the right PSU Update and click on the right side hamburger sign, and click on Patch prechecks. Once you click on the pre-checks, it confirms if the patch is downloadable and /u01 mount on the DBCS instance host has enough free space available.


You can navigate through "Activity" tab to see the pre-check detail steps.


Once the pre-check completes, then initiates the actual patching job, it asks for the Patching Notes and choose whether you want to patch with "Switch-over" so there is no down-time.


The node hosting the standby database is patched first. A switchover operation is performed after patching is complete on the standby and then the patch is applied to the node hosting the new
standby.


If you want errors to be ignored during the patching operation, select the Force apply patch option. Then, click Patch.


Hope it helps, thanks for reading, please subscribe to this blog to stay updated with latest news on Oracle Cloud Infrastructure and Oracle Autonomous Database Cloud Services and new articles.

Twitter : https://twitter.com/rajsoft8899
Linkedin : https://www.linkedin.com/in/raj-kumar-kushwaha-5a289219/
Facebook : https://www.facebook.com/rkushawaha


Thursday, March 5, 2020

Oracle Cloud Infrastructure Cloud Shell


One of the most awaited feature every Oracle Cloud Admin, developers were waiting for is now released by Oracle - Oracle Cloud Infrastructure "Cloud Shell". Cloud Shell is a web based browser terminal accessible from the Oracle Cloud console.

Cloud Shell provides Linux shell with a pre-authenticated OCI CLI. This feature is available for all Oracle Cloud users and accessible from console. 


Cloud Shell provides:

* An ephemeral machine to use as a host for a Linux shell, pre-configured with the latest version of the OCI Command Line Interface (CLI) and a number of useful tools

* 5GB of storage for your home directory

* A persistent frame of the Console which stays active as you navigate to different pages of the console


Following are the Tools Included With Cloud Shell:

Cloud Shell is a small Linux virtual machine. In addition to the OCI CLI, the Cloud Shell VM comes with current versions of several useful tools and utilities pre-installed, including:

> Git
> Java
> Python (2 and 3)
> SQL Plus
> kubectl
> helm
> maven
> gradle
> terraform


TO start the OCI Cloud Shell, you just have to click on Cloud Shell icon just left to the console notification bell icon at the right top.


 Once you click on the Cloud Shell, a small Linux virtual machine gets created that is equipped with latest oci cli and other various tools listed above and finally you are ready to interact with Oracle Cloud resources from the web-based terminal.


To allow a group of users to use the Cloud Shell, you need to create an IAM policy for this so that all users in that group can use it.

allow group group_name to use cloud-shell in tenancy


Hope it helps, thanks for reading, please subscribe to this blog to stay updated with latest news on Oracle Cloud Infrastructure and Oracle Autonomous Database Cloud Services and new articles.


Twitter : https://twitter.com/rajsoft8899
Linkedin : https://www.linkedin.com/in/raj-kumar-kushwaha-5a289219/
Facebook : https://www.facebook.com/rkushawaha


Oracle Cloud Infrastructure OS Management


Oracle Cloud Infrastructure OS Management service provides simple and very robust tool for general operation system maintenance activities for the compute instances running on Oracle Cloud OCI.

Using this OS management service, you can monitor the packages installed on compute instances, you can do the linux packages maintenance works i.e. adding/installing new packages, removing the existing packages or updating the existing one when that becomes available to its public yum repository.

OS management service is not enabled by default. It is an agent based service that you have to enable by installing osms-agent agent on the underline compute node.


All compute instances which has enabled osms-agent installed is called managed instance. You can manage the managed instances individually or you can group the managed instances and do the bulk maintenance but all the managed instances in the group must have same OS and version.

For detailed learning and understanding of the OS Management service - click here.


Monday, February 17, 2020

Oracle Database 20c Documents available now !!


Here is the great news arrived that we had been waiting for.


Oracle Database 20c documentation available now here

https://docs.oracle.com/en/database/oracle/oracle-database/20/install-and-upgrade.html


Hope it helps, thanks for reading, please subscribe to this blog to stay updated with latest news on Oracle Cloud Infrastructure and Oracle Autonomous Database Cloud Services and new articles coming up for Oracle 20c new features series.

Twitter : https://twitter.com/rajsoft8899
Linkedin : https://www.linkedin.com/in/raj-kumar-kushwaha-5a289219/
Facebook : https://www.facebook.com/rkushawaha